PNG files are popular types of pictures, particularly for screenshots. One major advantage of a PNG image is that it supports lossless compression. This means it can be compressed without losing much of its original quality. However, despite PNG files being popular, they aren’t always compatible with all platforms.
So, you may get into a circumstance where you have to know, “How do you convert PNG to JPG on Mac.” Luckily, this article will guide you in doing just that through the built-in tools of Mac. We will showcase 3 methods here, and you can select the method that suits you best.
Table of Contents
ToggleWhat Is The Difference between PNG And JPG?
When you look at a PNG and a JPG picture side by side, it is tough to spot the difference. But why do we have these two different types of images? JPEG, short for Joint Photographic Experts Group, is a format mainly for digital pictures, like photos. JPEG images can be compressed, making them smaller for easy sharing with people.
However, it also lowers the quality of pictures extremely. Sometimes, when you compress JPEG files too much, they turn all blurry. Due to how JPEG images are compressed, they have fewer data compared to PNG images. This means JPEG files are generally smaller.
PNG, which stands for Portable Network Graphics, supports lossless picture compression. It was made to replace GIF. PNG files aren’t affected by compression, so they always give clear and sharp pictures. However, PNG images tend to be much larger compared to JPGs, which can make sharing them tough. One great thing about the PNG format is that it supports transparent backgrounds.
That is why it is great for text images and graphic design. It’s one of the key reasons why many operating systems save screenshots as PNG files. However, PNG isn’t ideal for high-quality printing since it doesn’t support CMYK.
How Can You Convert PNG to JPG on Mac OS?
Don’t worry if your picture is saved in the “incorrect format” on your Mac device. Converting PNG to JPG is very easy on a Mac OS with only a few clicks. Your Mac device comes equipped with various built-in functions and apps that can help you turn your PNG files into JPG files or other formats easily.
You can use these tools to convert one or multiple PNG images to JPG images for free. And if you ever need to, you can also convert JPG to PNG using these same tools on your Mac.
How Can You Convert PNG to JPG on Mac Using Preview?
Converting PNG files to JPG files is simple in many Mac applications, but the easiest way is through Preview. With Mac Preview, you can not only view and edit different file types but also effortlessly convert PNG files to JPG files.
First Step
First, open Finder and find the PNG file you want to change to a JPG file.
Second Step
Double-click on the PNG image, and it will show up in the Preview app. If Preview isn’t set as default, just right-click on the PNG file, then go to “Open with,” and select “Preview.”

Third Step
Next, click on “File” in the top menu bar, then select “Export.”

Fourth Step
In the Export dialog box, find the Format section. Then, tap the drop-down menu, which is currently set to PNG, and pick JPEG. Use the slider to adjust the image quality if needed. However, it’s usually best to stick with the default setting for the picture quality.

Fifth Step
Type in a file name and choose where you want to save your new file. Then, press “Save.” After that, you can find the converted JPG file on your Mac in the location you selected.

How Can You Convert PNG to JPG on Mac Using Quick Actions?
Quick Actions assist you in completing various tasks on Mac and simplifying your work efficiency. They can even easily convert PNG files to JPG files for you. Just follow these easy steps below.
Step 1
In Finder, right-click on the PNG file that you wish to convert.
Step 2
Hover your mouse over Quick Actions in the menu and select “Convert Image” on the right side.

Step 3
In the “Convert Image” window that pops up, pick JPEG as the format and select a size for the picture. It is usually best to stick with the default image size.

Step 4
Finally, tap on Convert to JPEG. You can find the JPEG file in the same place where the PNG file was saved on your Mac. If needed, edit the file name and click Enter to store it. Also, you can choose multiple PNG files, right-click on them, and use Quick Actions to convert them all at once.

How Can You Convert PNG to JPG on Mac Using Photos?
Your Mac’s built-in Photos app is another free tool that can assist you in converting multiple PNG files to JPG format.
1st Step
On your Mac device, launch the Photos app.
2nd Step
Choose the Library tab from the left sidebar. Then, drag and drop the PNG pictures into the right pane.
3rd Step
Choose the PNG pictures in the Photos app.

4th Step
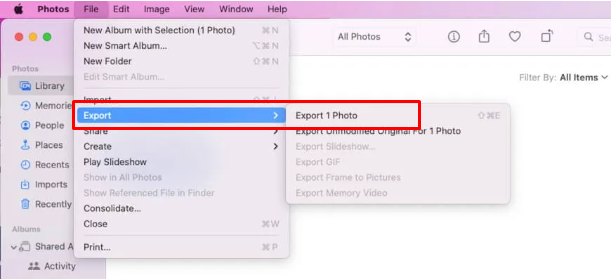
Press the “File” option in the top menu bar. Then, select “Export” followed by “Export [number] Photos.”
5th Step
Select the JPEG format under “Photo Kind” and then press the Export button.

6th Step
Finally, pick a location to store the JPG files.
Conclusion
In conclusion, you can say that the answer to “How do you convert PNG to JPG on Mac?” is quite simple. However, converting a PNG file to a JPG file on the Mac might seem daunting at first. It can feel even more overwhelming if you are not sure how to begin.
The methods discussed in this article are some common methods to do this conversion. Hopefully, once you read this article, you’ll have a better understanding of how to switch your picture’s format, and you will feel more confident about doing it.
