Do you want to find out how to open a PNG image in Photoshop?
Occasionally, you may simply obtain transparent PNG images online or in your possession, but if you would like to alter them to a different style, you must open the file. To provide a design with a solid foundation, it’s essential to open PNG images in Photoshop.
Now we will see how to open it in Photoshop. This tutorial will guide you through the process of opening a PNG image in Photoshop, unraveling the steps seamlessly for a clearer understanding. Even if you can’t do graphic design, I hope you can do it very easily after reading this tutorial.
Table of Contents
ToggleWhat is a PNG file used for?
PNG is short for Portable Network Graphic, a type of raster image file. It’s a particularly popular file type with web designers because it can handle graphics with transparent or semi-transparent backgrounds. It can be applied to any of your custom designs. Assume you are creating a Facebook post for someone who requires a transparent background image. In this case, the PNG format is required.
What is the Photoshop?
Adobe’s Photoshop stands as a powerful software, dedicated to image creation, graphic design, and precise photo editing. Offering a multitude of features, it excels in handling pixel-based images, raster graphics, and vector graphics with finesse.
How do I edit a PNG file in Photoshop?
To open a PNG image in Photoshop, you need to follow these six simple steps.
- Launch Photoshop
- Open Image
- Select “Open”
- Locate PNG File
- Choose PNG File
- Click “Open”
Download PNG Image to your device, If you need a transparent PNG image before editing, you can get one for free from PNGArc.
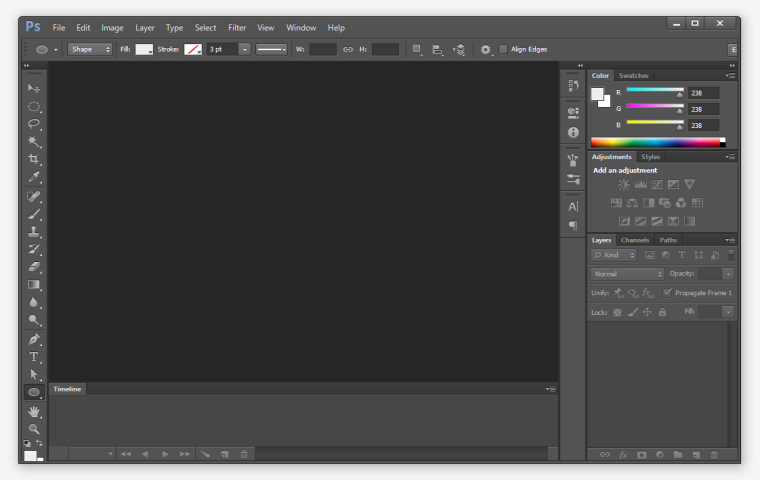
1. Launch Photoshop:
To efficiently work with PNG files, open Adobe Photoshop on your computer. Make sure to download and install Photoshop if you haven’t already in order to take advantage of its robust tools for editing and manipulating images. With Photoshop’s extensive toolkit and intuitive interface, editing and improving PNG images is a breeze. To fully utilize your PNG files, Photoshop is a must-have application for enhancing transparency, modifying color, and adding artistic aspects.
2. Open Image:
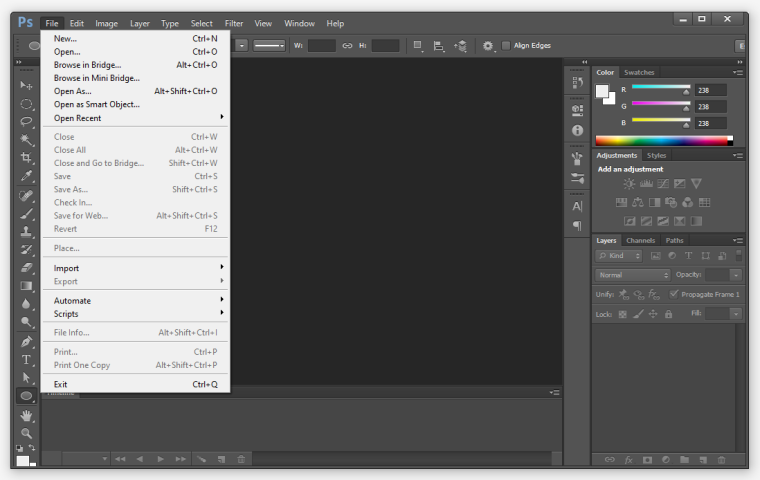
In Photoshop, go to the “File” menu at the top-left corner.
3. Select “Open”:
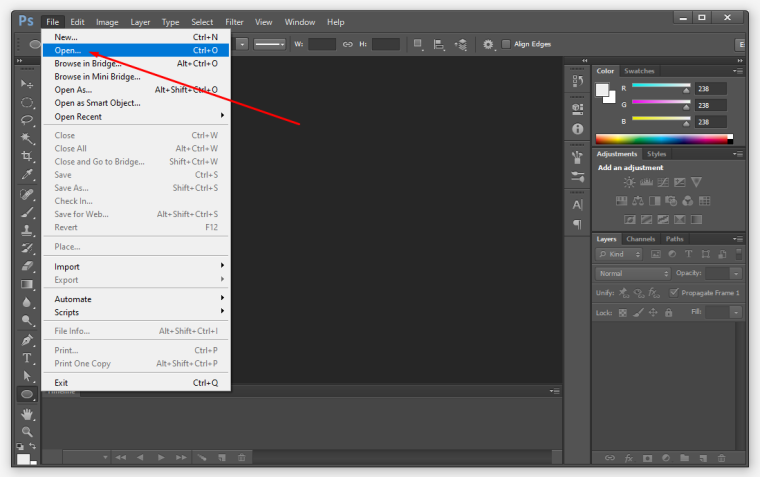
Choose the “Open…” option from the File menu.
4. Locate PNG File:
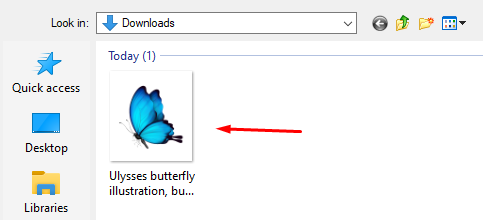
Navigate to the location where your PNG file is saved.
5. Choose PNG File:
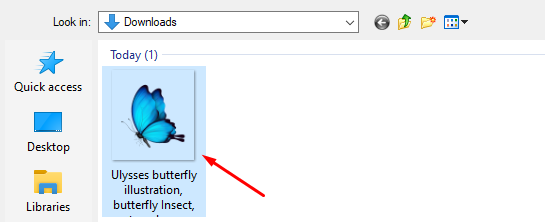
Select the PNG file you want to open.
6. Click “Open”:
Click the “Open” button to import the PNG image into Photoshop.
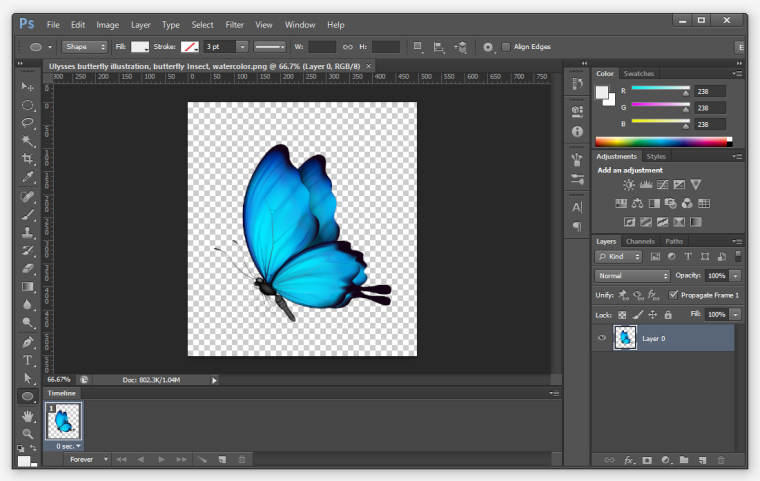
Now, the PNG image will be displayed in the Photoshop workspace, and you can proceed with editing or making changes as needed. Keep in mind that PNG is a format that supports transparency, so if the image has a transparent background, it will be preserved in Photoshop.
Remember to save your changes after editing the image by going to “File” > “Save” or “File” > “Save As…” if you want to save it with a new name or in a different format.
How do I crop a PNG in Photoshop?
To crop a PNG image in Photoshop after opening it:
- Select the “Crop Tool” from the toolbar on the left (shortcut: C).
- Adjust the crop area by clicking and dragging the corners or sides of the bounding box.
- Press Enter or click the checkmark in the options bar at the top to apply the crop.
- To fine-tune, you can still adjust the crop by clicking and dragging within the cropped area or re-accessing the “Crop Tool.”
After cropping, you can save the edited PNG image using the steps mentioned earlier.
How do I resize a PNG in Photoshop?
To resize a PNG image in Photoshop:
- Open your PNG file in Photoshop.
- Click on “Image” in the top menu.
- Choose “Image Size” from the dropdown menu.
- In the dialog box that appears, enter the desired dimensions in the “Width” and “Height” fields.
- Make sure the “Constrain Proportions” option is checked to maintain the original aspect ratio.
- Select the preferred unit of measurement (pixels, inches, etc.).
- Click “OK” to apply the changes.
After resizing, you can save the edited PNG image using the steps mentioned earlier if needed.
Wrapping Up
This concludes things, at last. You recently learned how to use Photoshop to open a PNG image.
It wasn’t too difficult to follow this tutorial. Thus far, you have acquired six easy-to-follow, step-by-step methods. You also discover the necessity of using Photoshop to alter transparent PNG images.
Frequently Asked Questions
Can we edit PNG in Photoshop?
Photoshop makes it simple to perform any kind of processing on your PNG files. If you follow the right procedures, importing, modifying, and exporting can all be completed quickly.
Does PNG have layers?
Yes, but in Adobe Fireworks CS6 .PNG format.
How do I make a PNG transparent in Photoshop?
Open your PNG file.
Select the layer containing the image.
Click on the “Add Layer Mask” icon at the bottom of the Layers panel.
Use the Brush tool with black color to paint over areas you want to make transparent.
Save your file in a format that supports transparency, such as PNG.
How do I import a PNG into Photoshop with a transparent background?
Importing a transparent PNG image takes a few minutes. Just follow these few simple steps: Save/Download PNG Image to your device > Open Adobe editing software > Click ‘File’ and ‘Import’ > Click the ‘Import’ button
How do I make a PNG JPEG with a transparent background?
You cannot directly save a JPEG with transparency. Convert the image to a PNG with a transparent background. Then, convert the PNG to a JPEG, accepting the loss of transparency.


